

Learning how to braise on our own can prove to be a difficult task, but with a little practice, this classic cooking technique can quickly become a staple in your kitchen. Braising is a slow-cooking method and is ideal for preparing hearty meals for the whole family. From fall-off-the-bone ribs to a tender beef stew, braising ensures all the flavours in a dish are locked inside one pot and are slowly dispersed evenly throughout the dish.
You know you want to get braising, but don’t know where to start? Here is a guide on braising, including a complete breakdown of the method, some of our favourite recipes, and of course, a care and use section to ensure your braiser withstands the test of time.
What is braising?
Braising is a cooking technique that uses both dry and wet heat and is typically used to prepare tougher cuts of meats and vegetables. This age-old technique embodies the set-it-and-forget-it nature of cooking, with the braiser allowing all the rich flavorus and moisture to tenderize its ingredients. The key to braising is to begin by searing ingredients at a high heat to create a natural browning effect. The ingredients are then submerged in liquid to cook slowly on low heat for several hours. The braiser will take care of the rest, ensuring all the flavours are locked in with a tight-fitting lid. Let us now take a closer look at the four steps to braising.
The 4 Steps to Braising
Braising is a relatively easy process, requiring four easy steps. Whether you are using a stainless steel braiser, enamelled cast iron, or a toughened nonstick one, the process does not change.

Step 1: Pre-Heat the Braiser
A braiser is designed to cook slow food evenly throughout and retains heat exceptionally well. The trick, however, at getting started is to make sure the braiser is properly heated up before cooking. A good way to test if the braiser is ready to be used is the Mercury Test. This test involves introducing two droplets of water in the braiser and monitor closely for the results. If the braiser is properly heated, the droplets of water will quickly transform into small round beads, much like mercury – hence the name. This is especially crucial when braising as the next step requires high temperature to sear successfully. Add in the cooking oil and process to step two.

Step 2: Searing
Season the cut of meat to your liking outside of the braiser before continuing. The next step is where the magic happens. Now that the braiser has reached the appropriate heat, it is time to sear the meat. This will lock in the juices and inject a new layer of flavour into the dish with a delicious brown crust forming on either side of the cut of meat. Typically, searing for three to four minutes on either side should do the trick as the goal is not to cook the meat completely. Searing not only adds flavour to the dish, but also introduces further texture and colour. Finish by removing the meat from the braiser and add in vegetables and any other aromatics to enrich the flavour profile of the dish.

Step 3: Add the liquid
Once the vegetables and any other ingredients are completely tender, remove them from the braiser. Choosing which liquid to add in will ultimately depend on the recipe. Stock and broth is typically used for this step, however, it can easily be substituted with wine or vinegar for further depth. Determining the quantity of liquid to submerge ingredients in can prove to be equally challenging. Using too much liquid can dilute the flavour of the stew, but can be easily corrected with a ladle. Typically, about one third to half of the meat should slow-cook in liquid, ensuring a truly tender final result. This step is also known as ldquo;deglazing.

Step 4: Add in the meat
The final step is arguably the easiest of the four. Once you have added in the liquid, it is now time to introduce the meat back into the braiser. The meat will slow-cook in this iconic pot for hours on low heat until it is completely tender. The braiser exposes ingredients to a consistent heat source, ensuring even heat distribution as the meat simmers slowly. Cover the braiser with its tight-fitting lid and let all the flavours integrate themselves gradually until it is ready to be served. The braiser will take care of the rest as you spend quality time with family or friends. Serve your guests directly out of the braiser for an added splash of colour at the dinner table!
Braising Recipes
Now that you know how to get braising, let’s put your knowledge to the test with four of our favourite braiser recipes. These recipes highlight the braiser’s versatility, ranging from preparing fall-off the bone ribs, to searing fish and frying chicken. Here is a brief breakdown of each.

Apple and Serrano Pepper Braised Pork Ribs
This apple and serrano pepper braised pork ribs recipe will quickly become a favorite as you become familiar with braising. This recipe features a number of rich flavours, with the black pepper, paprika, chilli powder, and mint injecting some much-needed spice to the dish.
Combine wine with cider, stock, bay leaves, apples, onions, celery, and peppers before adding in the ribs to the braiser. This mixture is designed to complement the dish and existing spices and will ensure the ribs become perfectly tender until they are ready to be served. Lock in all the flavours with the tight-fitting lid and let the braiser slow-cook the ribs for one hour. Finish off by broiling the meat on high heat for four minutes until a brown crust forms on either side of the ribs.
See the recipe
Braised Halibut Agrodolce
This braised halibut agrodolce recipe strikes the ideal balance between sweet and sour and is a healthy meal for the whole family. Sear both sides of the halibut until the skin achieves a golden brown colour ensuring flavour and a deeper texture. The next step involves sautéing the vegetables, including the peppers, onions, garlic, and fennel.
White wine and vinegar is recommended for this recipe, combining for a well-balanced agrodolce sauce. Once the liquid is in the braiser, add in the halibut and let the fish simmer on low heat. It should not take much longer than 12-15 minutes for the halibut to be cooked through and ready to serve. Garnish the dish with raisins, parsley, pine nuts, and fennel fronds for a complete meal.
See the recipe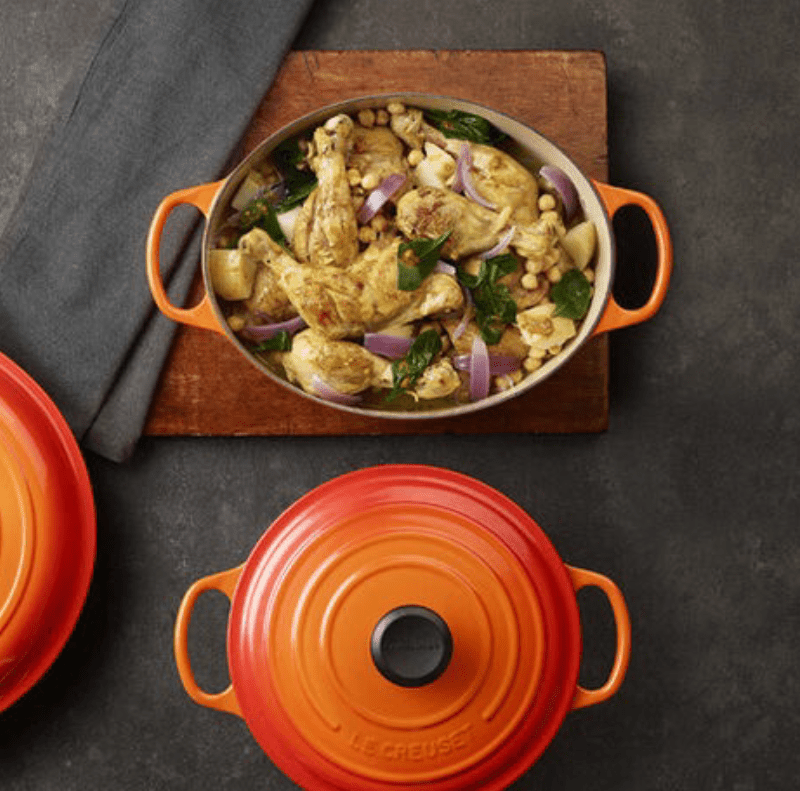
Curried Chicken Drumsticks
This curried chicken drumsticks recipe offers a unique twist on a traditional dish. This meal takes less than an hour to prepare and is sure to inject spice into your everyday routine. The curry powder, ginger, and turmeric mixture is not lacking in taste and compliments the chicken drumsticks to perfection.
Successful chicken drumsticks will ultimately come down to their crispness. The braiser creates the perfect environment for this dish to cook, exposing the chicken to a consistent heat source until a golden brown colour forms. Introduce the potatoes, chickpeas, and spinach as the drumsticks cook to prepare a complete and hearty meal.
See the recipe
Provencal Braised Chicken in Milk
This dish derives its inspiration from Provence, France, as the name would suggest. Begin by liberally seasoning the chicken with salt, pepper, and Provence herbs before heating up the braiser. Once the braiser is ready to be used, sear all sides of the chicken until they are browned.
The fresh thyme, bay leaves, and shallots contrast the chicken wonderfully, ensuring a healthy meal. Finish by bringing the milk to a simmer inside the braiser and slowly adding in the chicken. This step should take about one and a half hours until the chicken is completely tender. Before serving, reduce the milk into a sauce and serve alongside the dish.
See the recipeCare & Use
Before you get braising, it is imperative to understand the different materials the braiser is offered in. After all, this slow-cooking pot is extremely durable and can be passed on from generation to generation with proper care. The braiser comes in enamelled cast iron, stainless steel, and toughened nonstick. Here is a closer look at caring for each of them.
Enamelled Cast Iron
Enamelled cast iron cookware can be used on any cooktop, including induction. This material retains heat exceptionally well, offering superior heat retention while braising. Le Creuset silicone tools are typically recommended, however, wooden and heat-resistant plastic tools can also be used to stir ingredients. The enamelled cast iron material can also withstand metal tools, balloons, and whisks, but they should be used with care to avoid scraping the surface.
When it is time to clean the braiser, let the pot cool off before putting it in cold water. While the enamelled cast iron is built to last, thermal shock may occur. Soak the braiser in warm water for 15-20 minutes before removing any stubborn food residue. Metallic pads and abrasive cleaning agents should not be used, while nylon, soft pads and brushes are recommended.
Stainless Steel
The stainless steel braiser is also suitable for all cooktops and can even be used inside the oven up to 260ºC (500ºF). Silicone, wooden or heat-resistant plastic, as well as metal tools can all be used, however, caution should be exhibited with the latter. Metal tools should not be scraped over the surface or knock the top rim of the pan. Much like with enamelled cast iron, it is important to let the stainless steel braiser cool off before cleaning it. The cleaning process is very similar should food residue remain.
Fill the braiser with warm water once it is cooled down until the residue starts dropping off. If residue remains, nylon and soft abrasive pads are recommended to remove it. Metallic pads and abrasive cleaning agents will damage the surface and should be avoided.
Toughened Nonstick Pro
Much like its counterparts, the toughened nonstick braiser can be used on all cooktops, including induction. Le Creuset Silicone tools are once again recommended for all your stirring needs along with wooden or heat-resistant plastic tools. Metal tools used harshly could scrape the nonstick surface over time.
Cleaning nonstick cookware and removing residue is where it can get tricky. Only nonstick cleaning pads should be used to avoid stripping the surface. While the toughened nonstick braiser is dishwasher safe, handwashing it is typically recommended. Should food residue remain, soak the braiser in warm water until it is ready to be cleaned.
